I. Download App (Requires non-Mainland ID)
1. Register a US Apple ID by yourself (Free)
- Prepare an email address that has never been registered as an Apple ID and any phone number (the phone number can be registered with another ID, and a Mainland China number works fine).
- Go to https://account.apple.com/account to register, and select United States as the region.
- After registration, log into the account in the phone's App Store. It will ask to add a payment method. At that step, do NOT select credit card or PayPal, just tap Next directly to finish.
- Recommended: Read the comprehensive guide: How to Register a US Apple ID (Includes tax-free states, tips, and login instructions)
- If there is anything you don't understand, please refer to the detailed guide above. Paid support is available if you need help with this step.
- If you are too lazy to register and want to use a shared account, please check the shadowrocket tutorial which provides a shared ID.
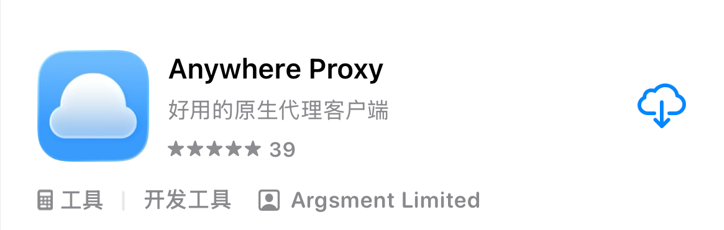
2. Download Anywhere Proxy
After changing the ID, search for Anywhere Proxy in the App Store, or directly:
II. Setup the Software
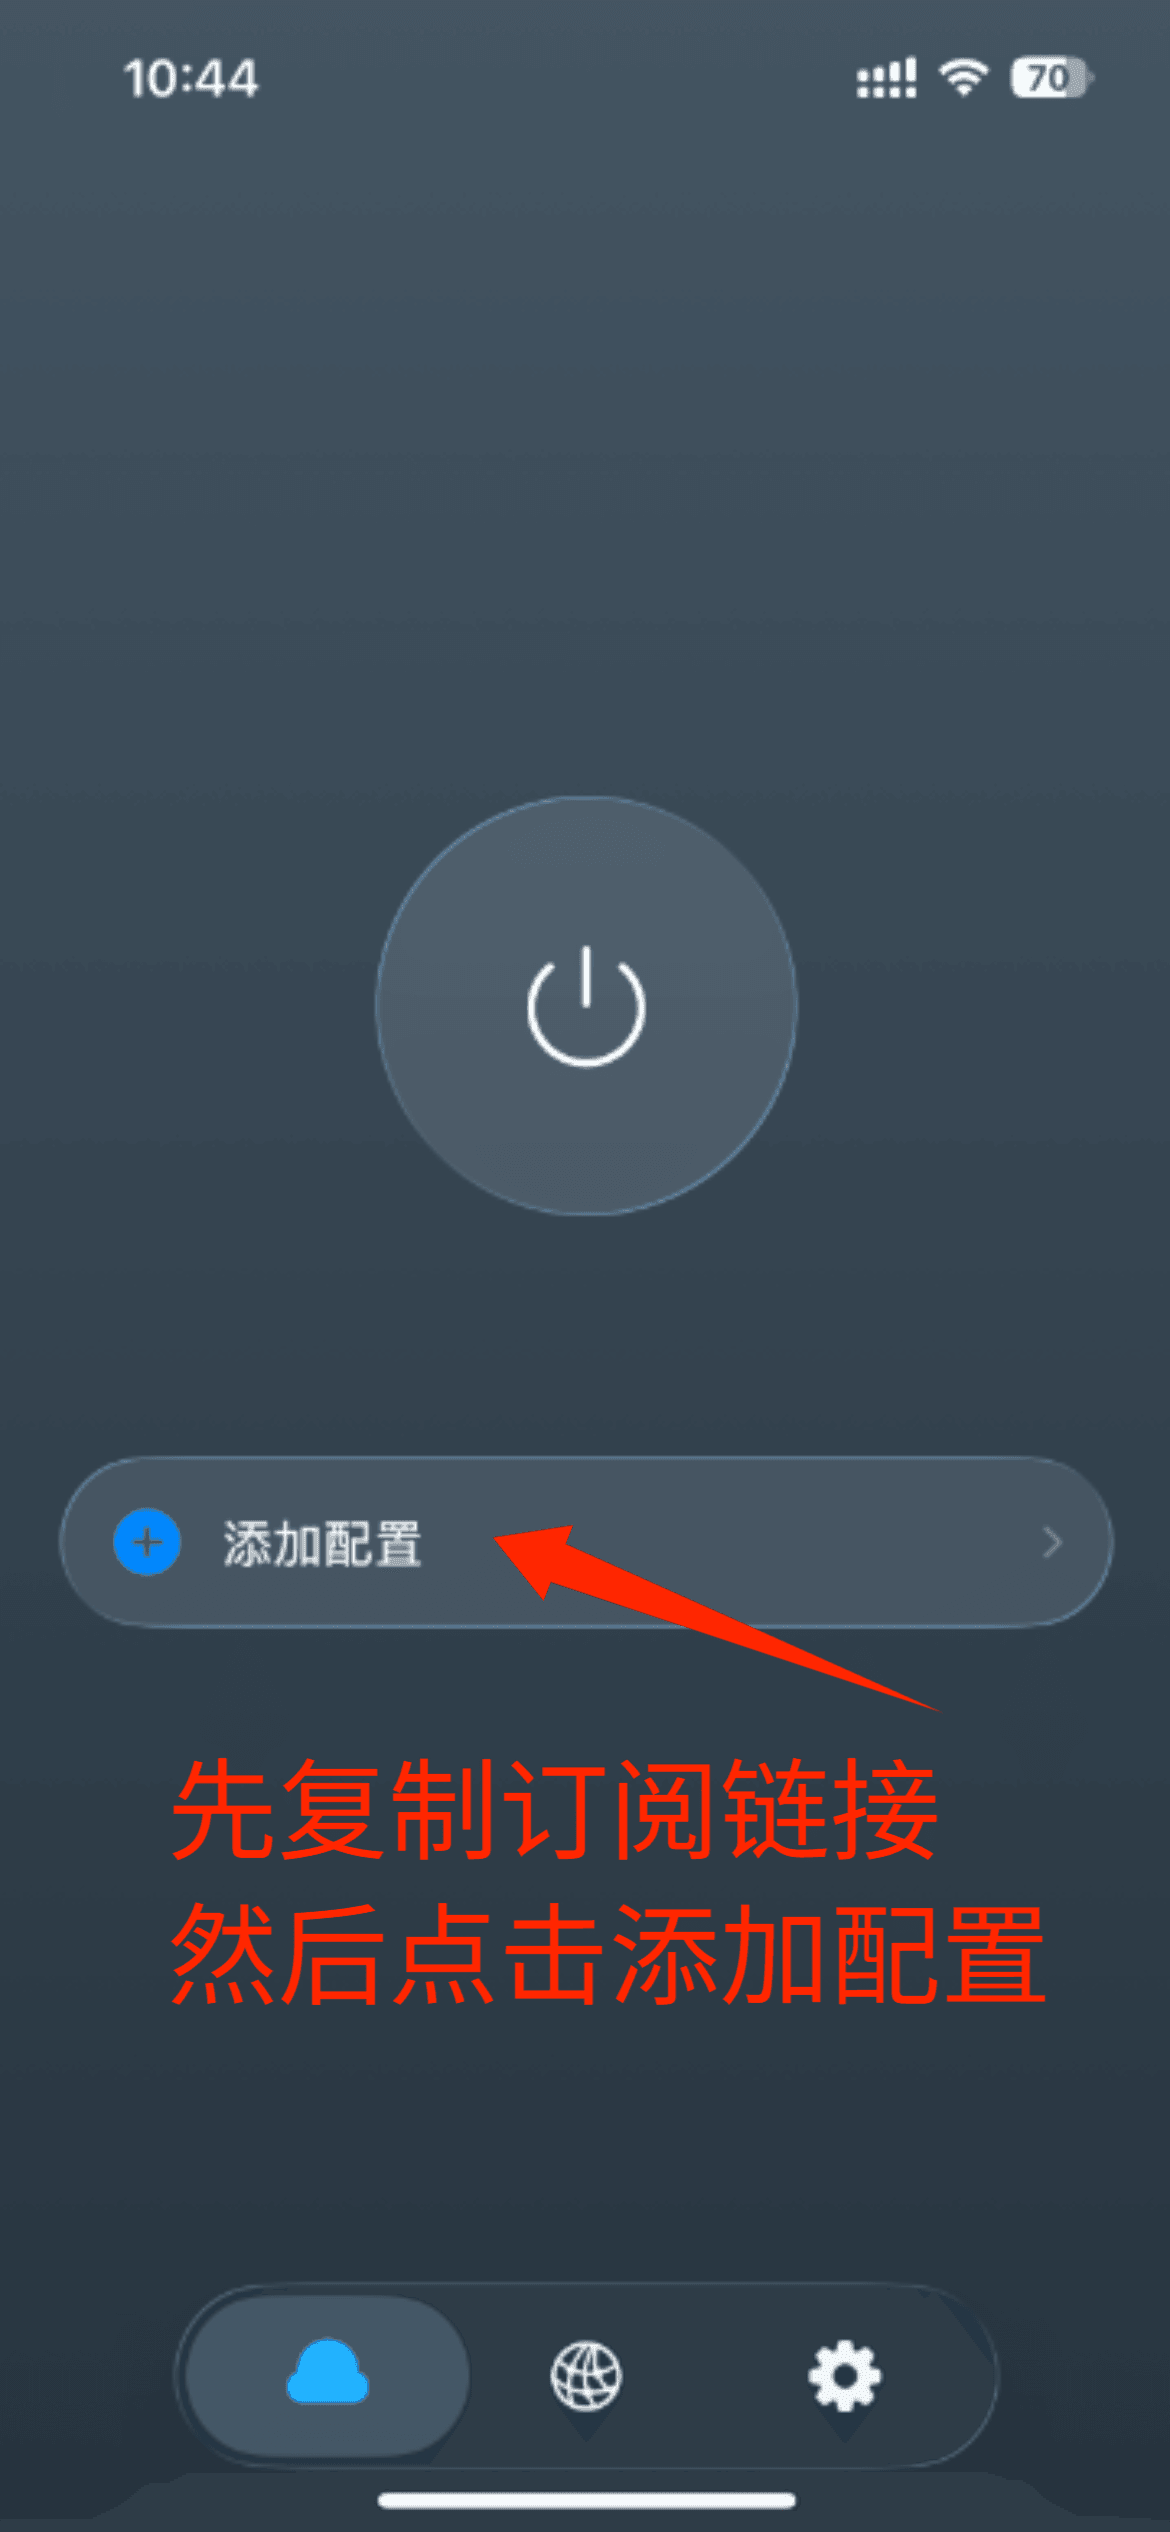
- Copy the Subscription Link and open the app.
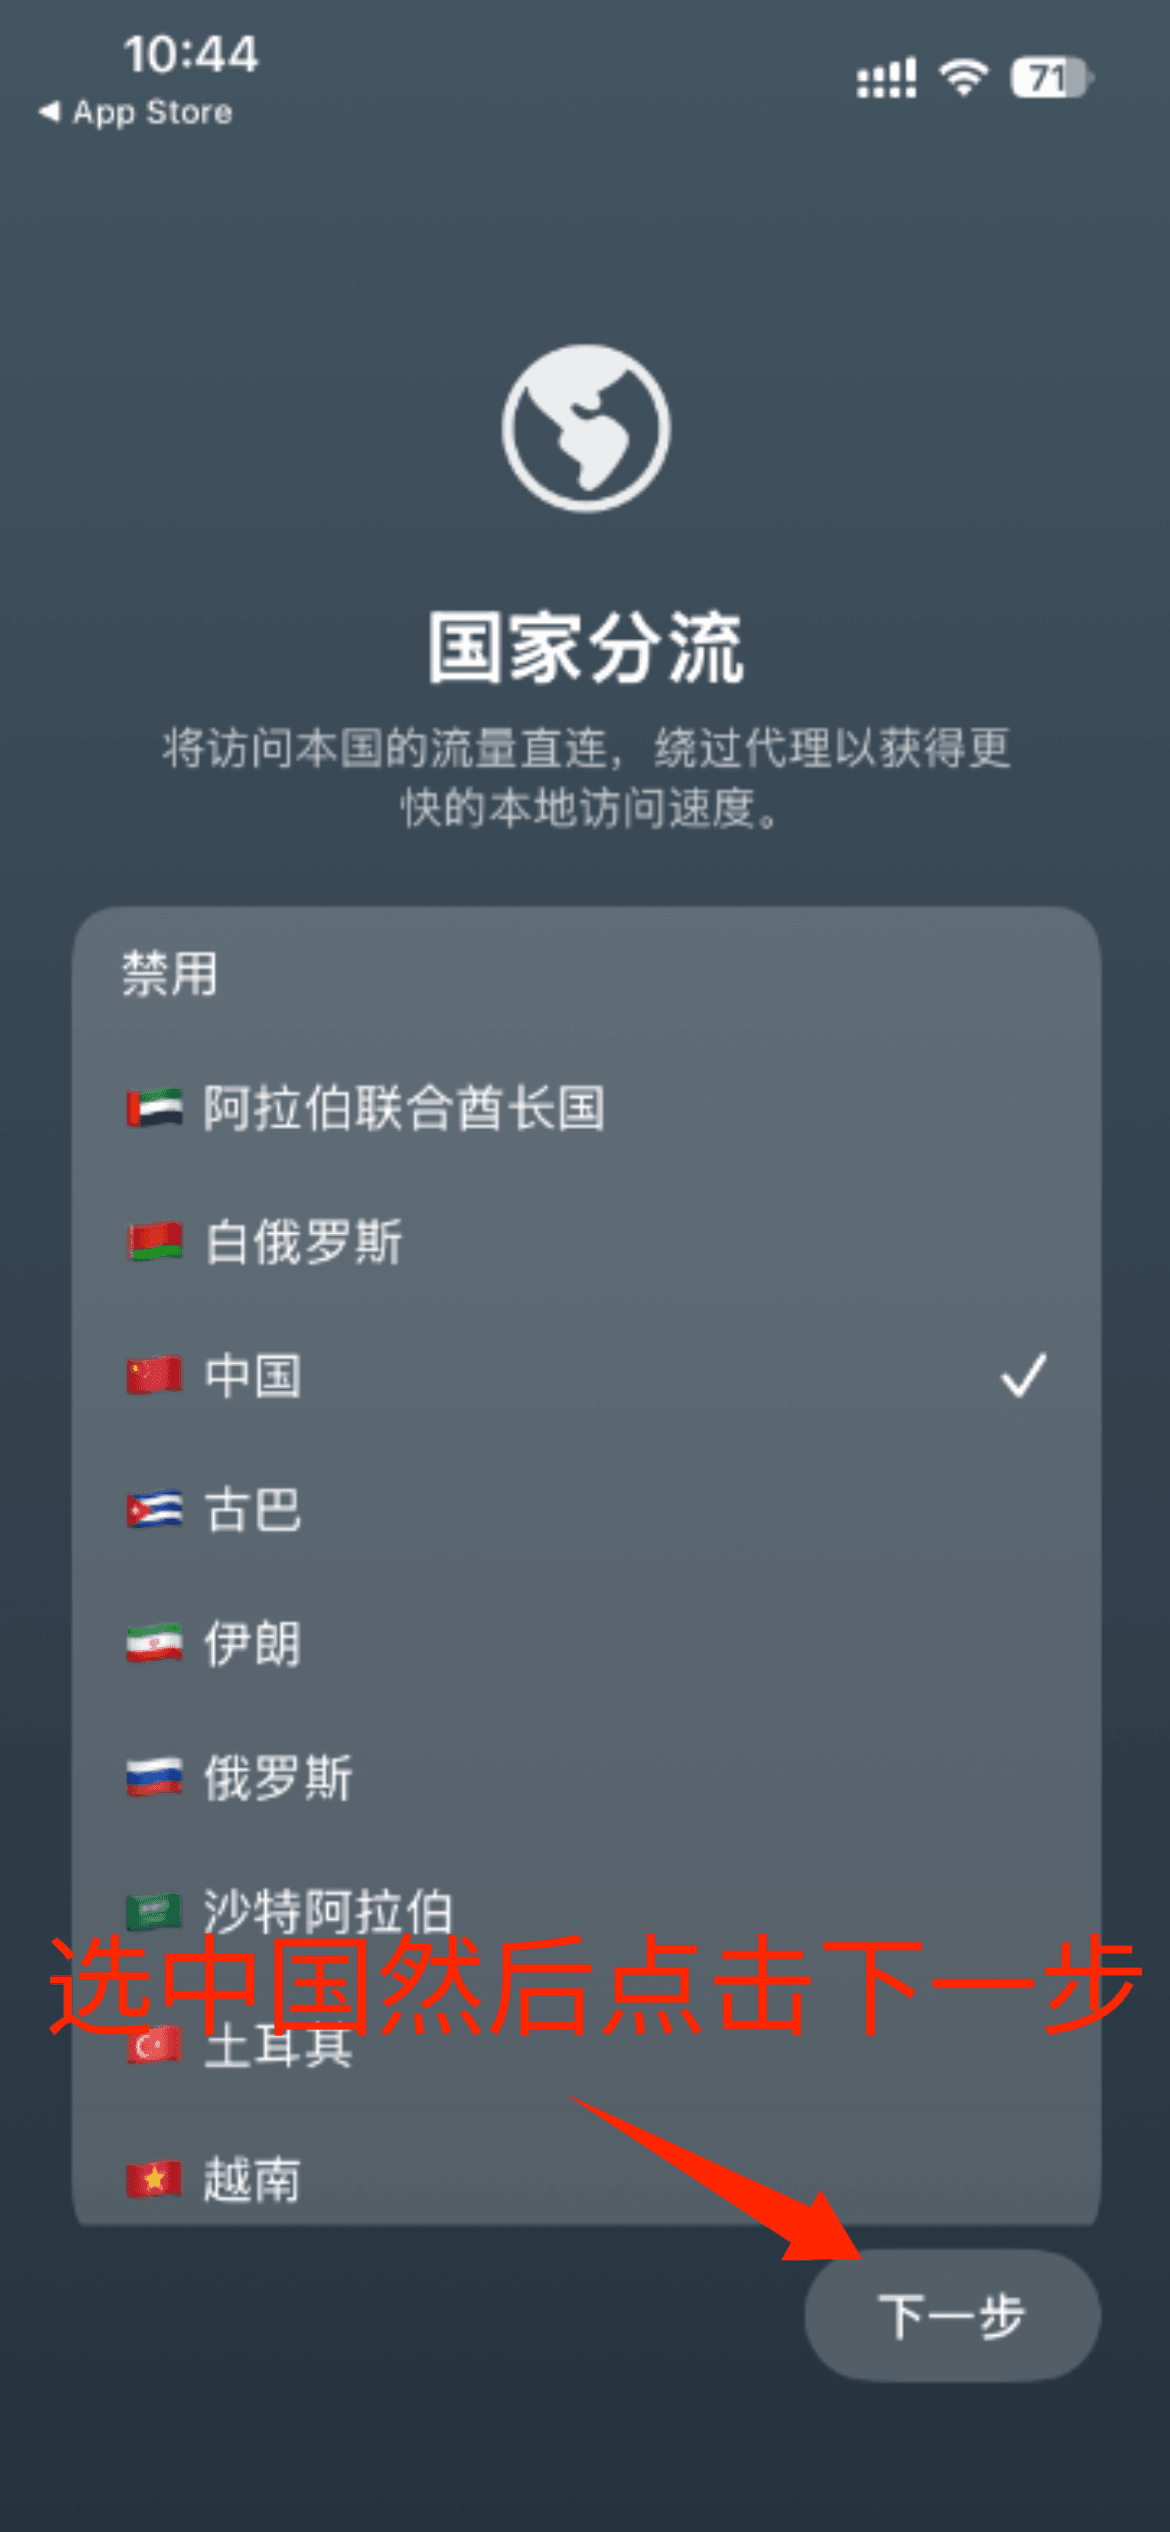
- Default country routing is China, click Next.
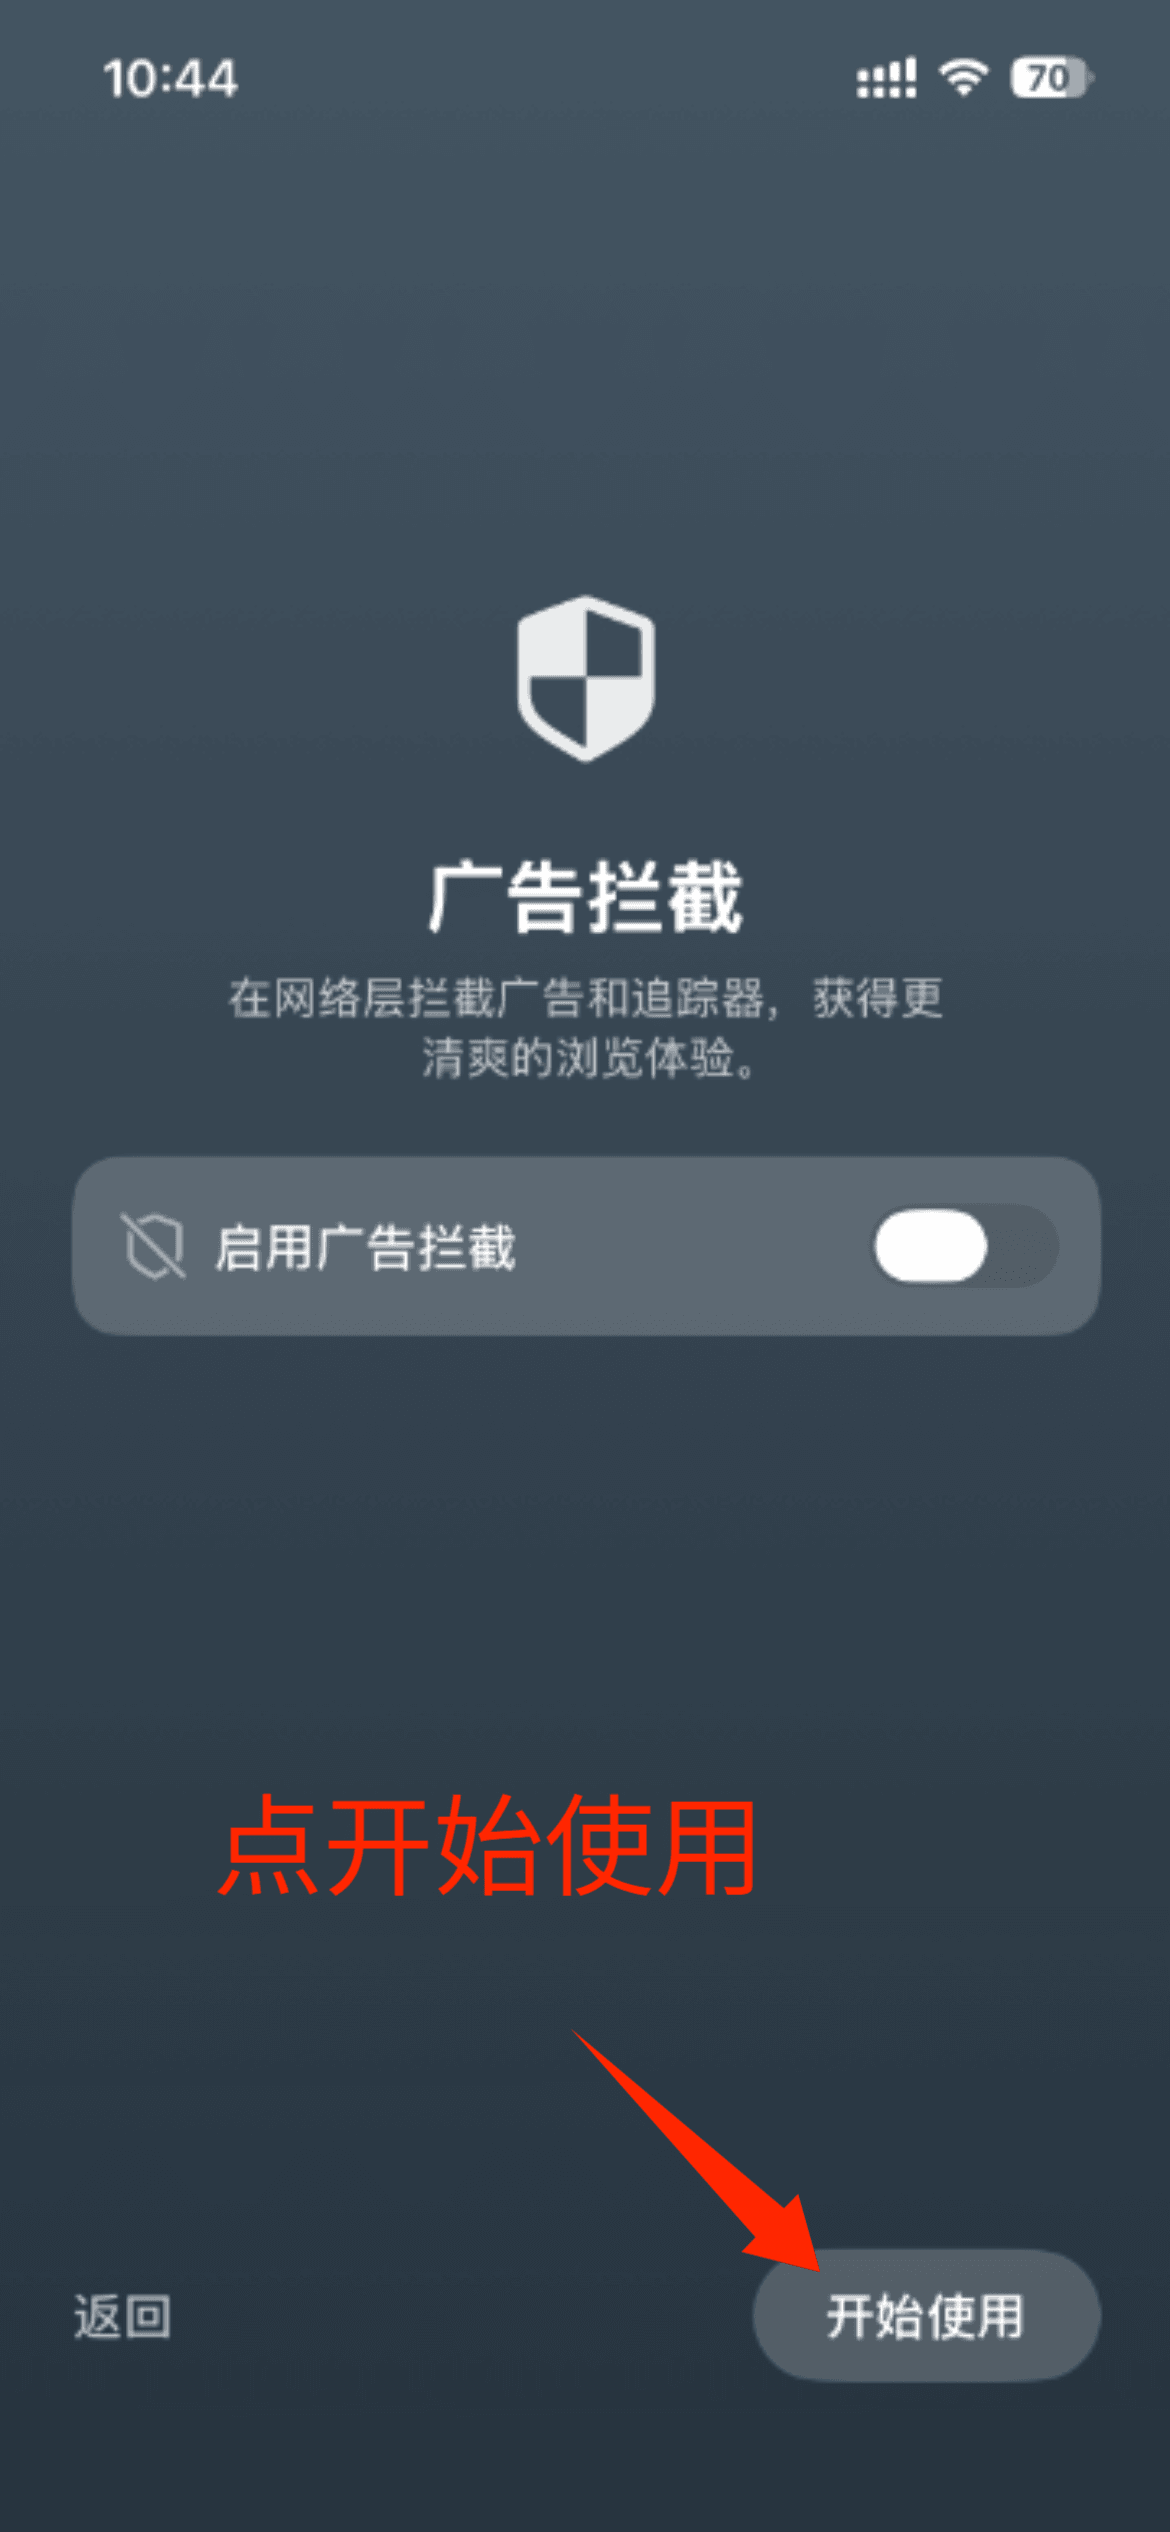
- Enable or disable Ad blocking based on your needs, click Start.
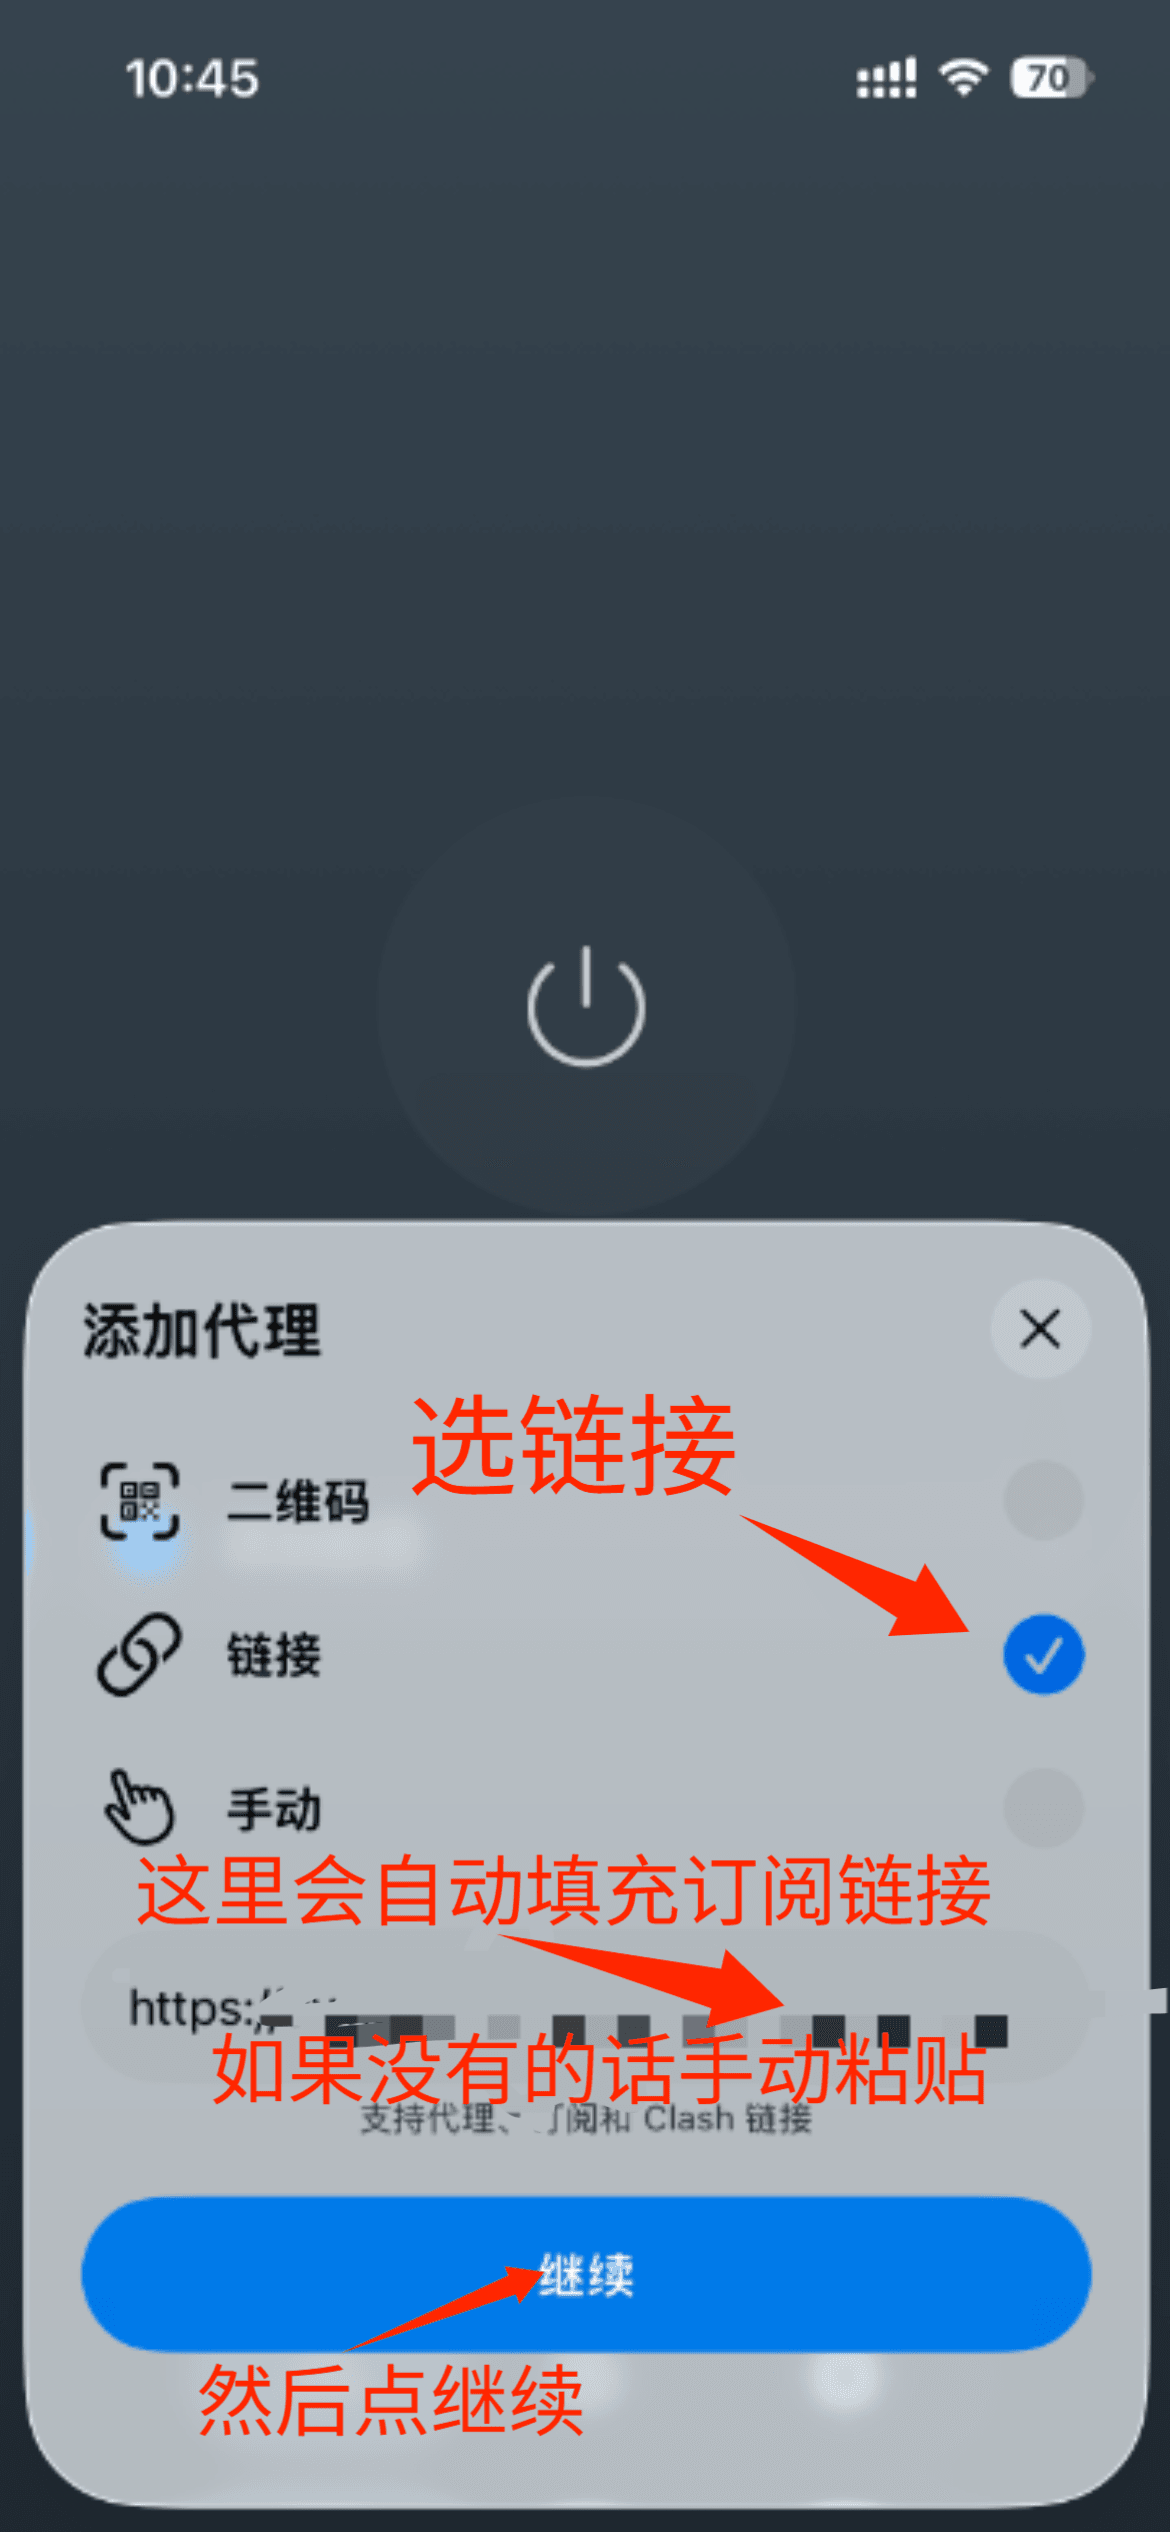
- Click Add Configuration.
- Select Link. It will ask to read the clipboard. Allow it, and your copied link will auto-fill. Click Continue.
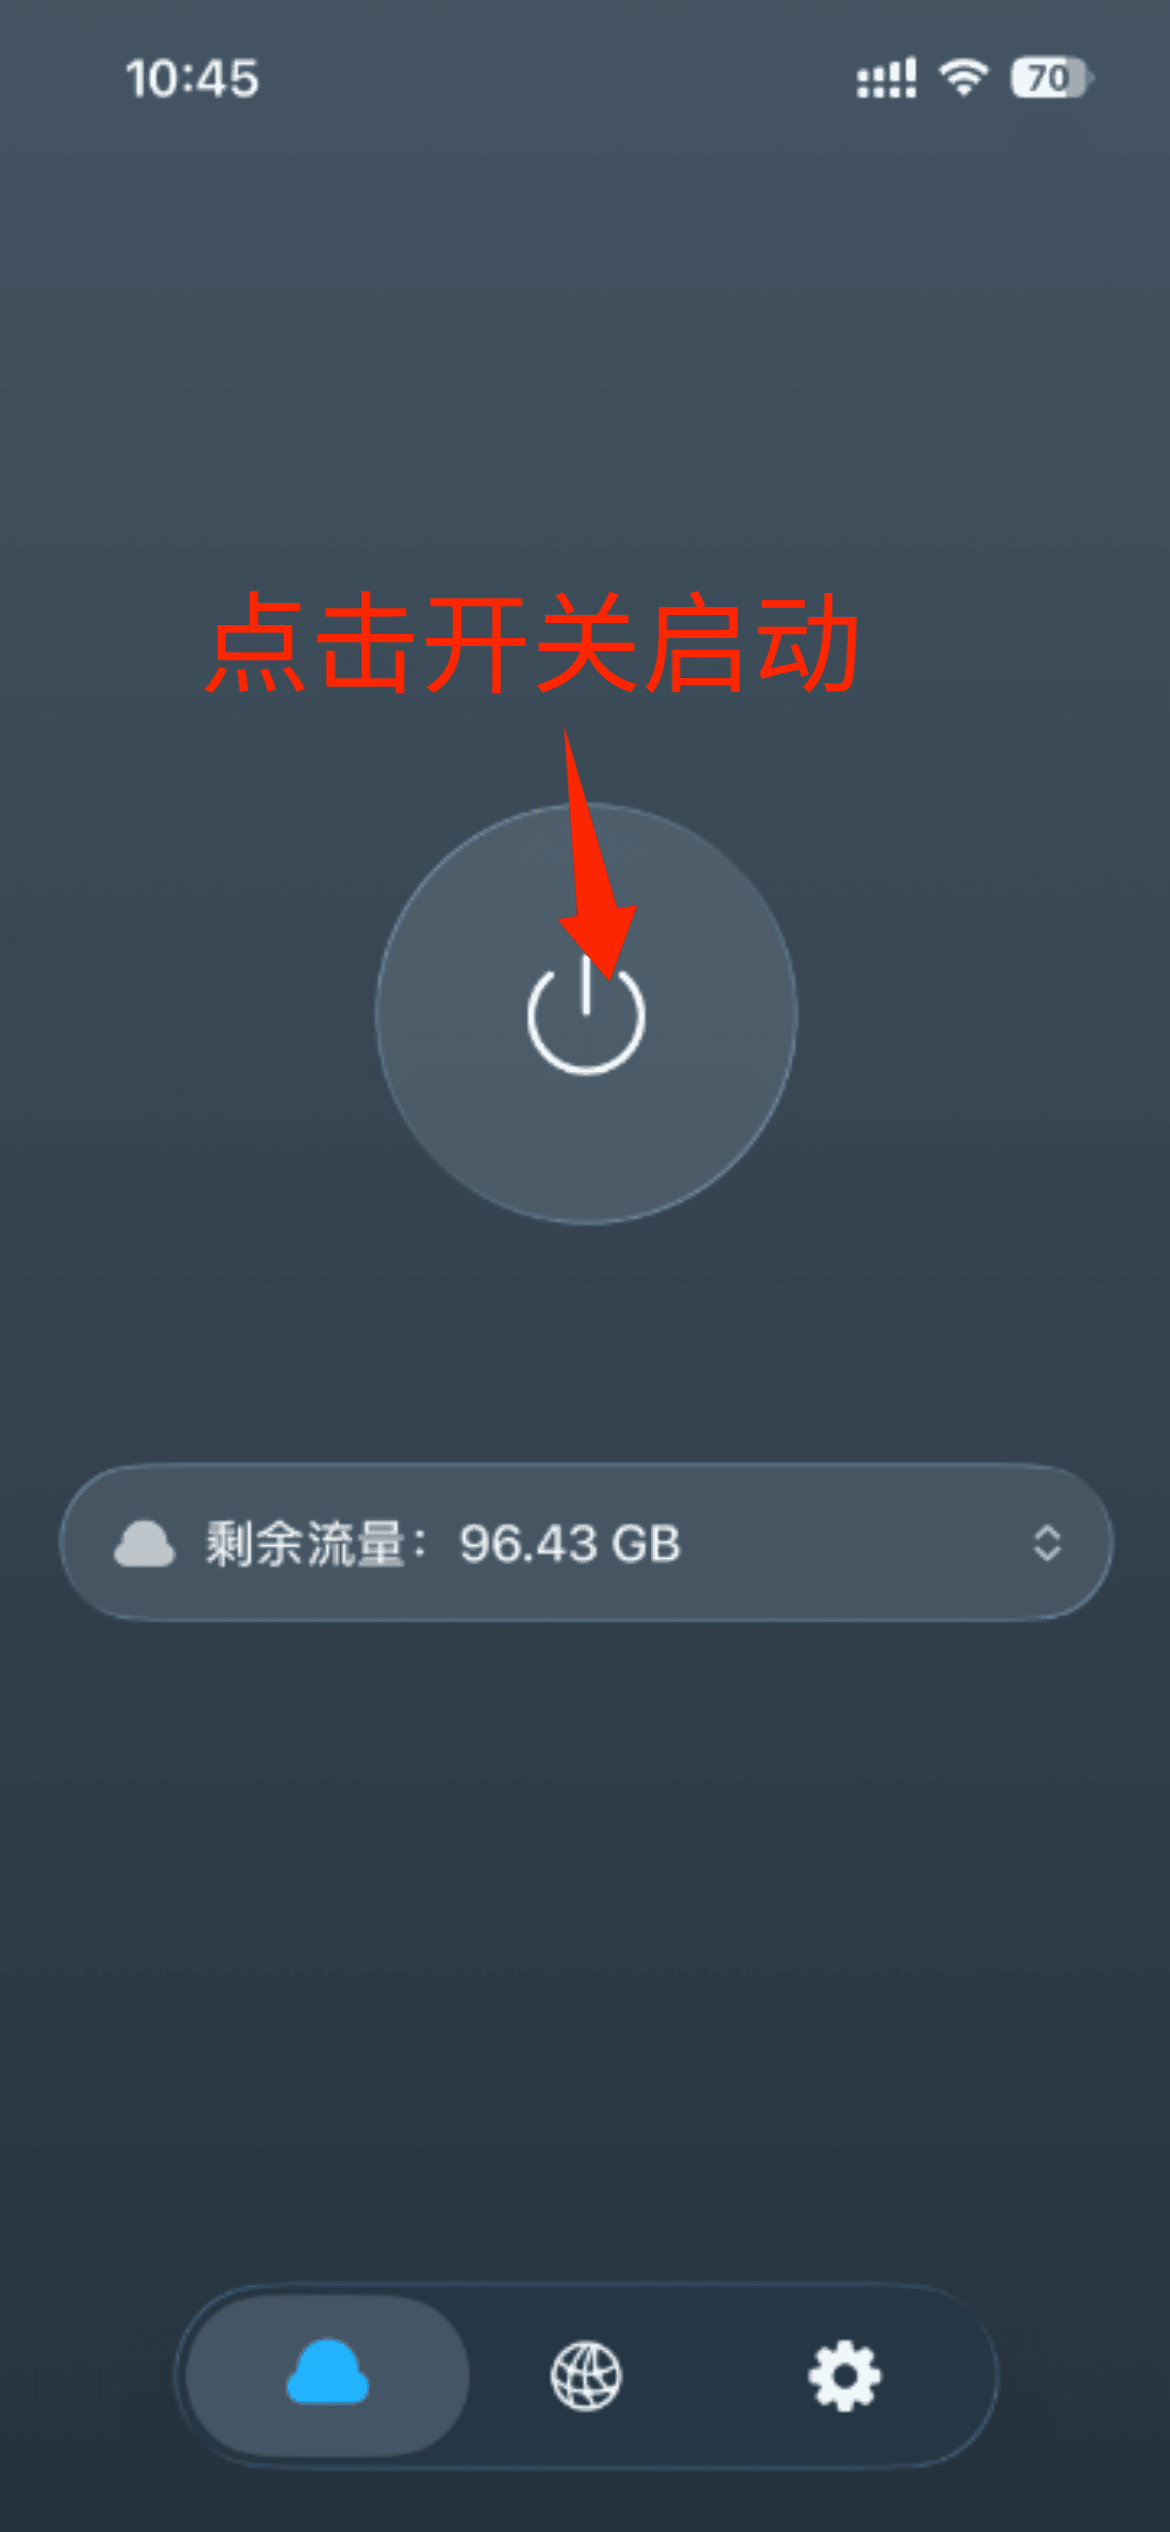
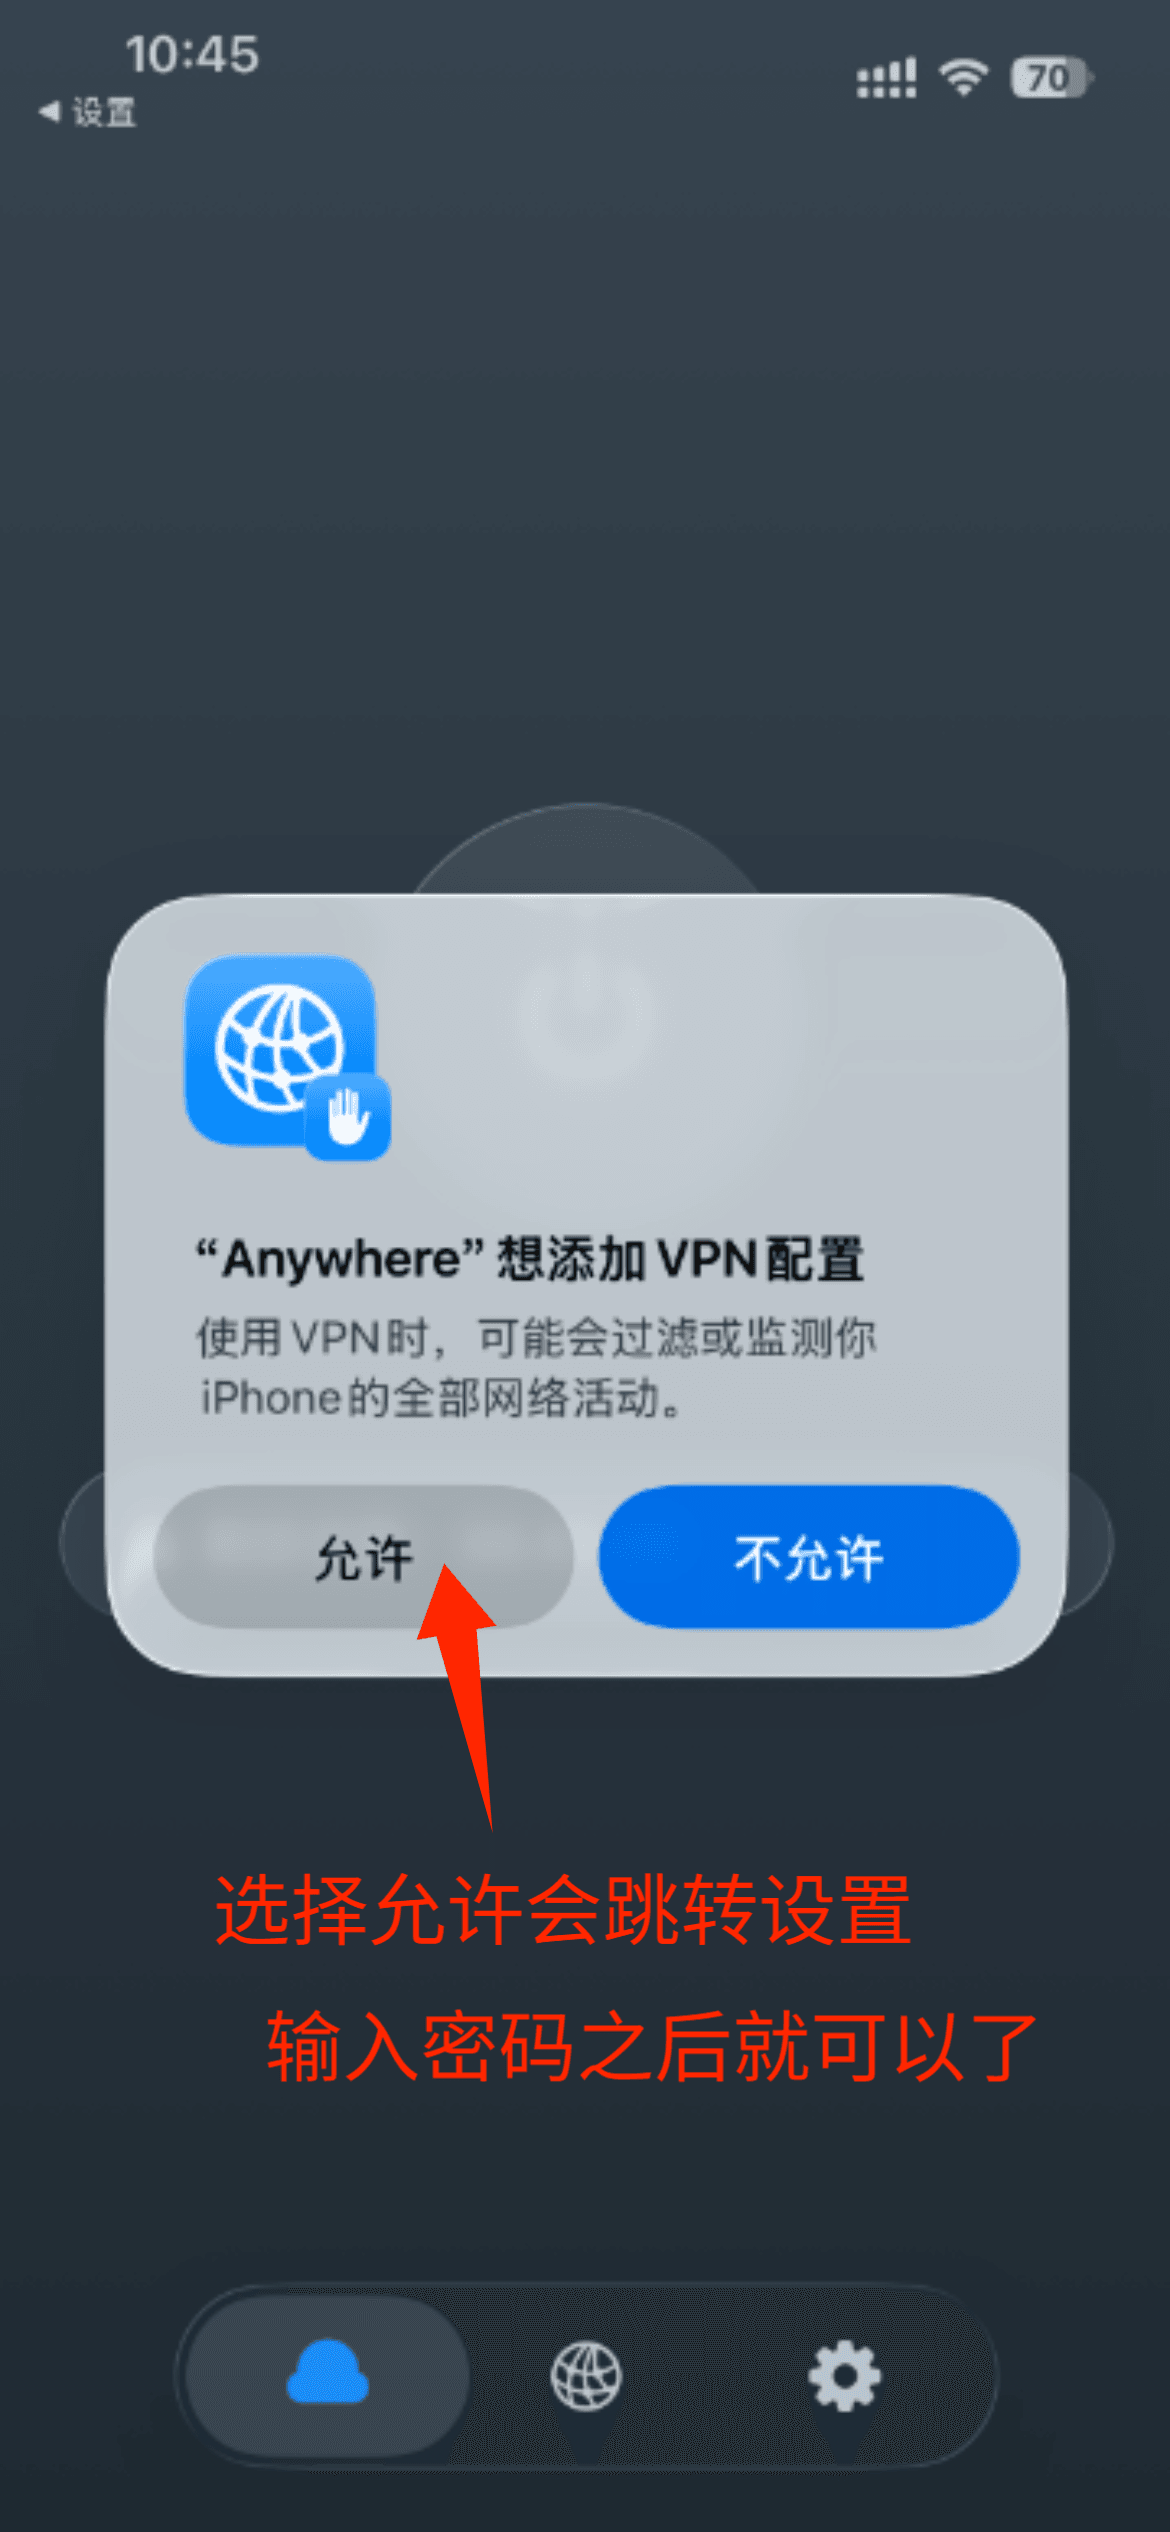
- Click the Switch to start. On the first run, it will prompt to Add VPN Configuration. Click Allow and enter your phone's passcode.
- The software is now working. You can open a browser and access Google.
Notes
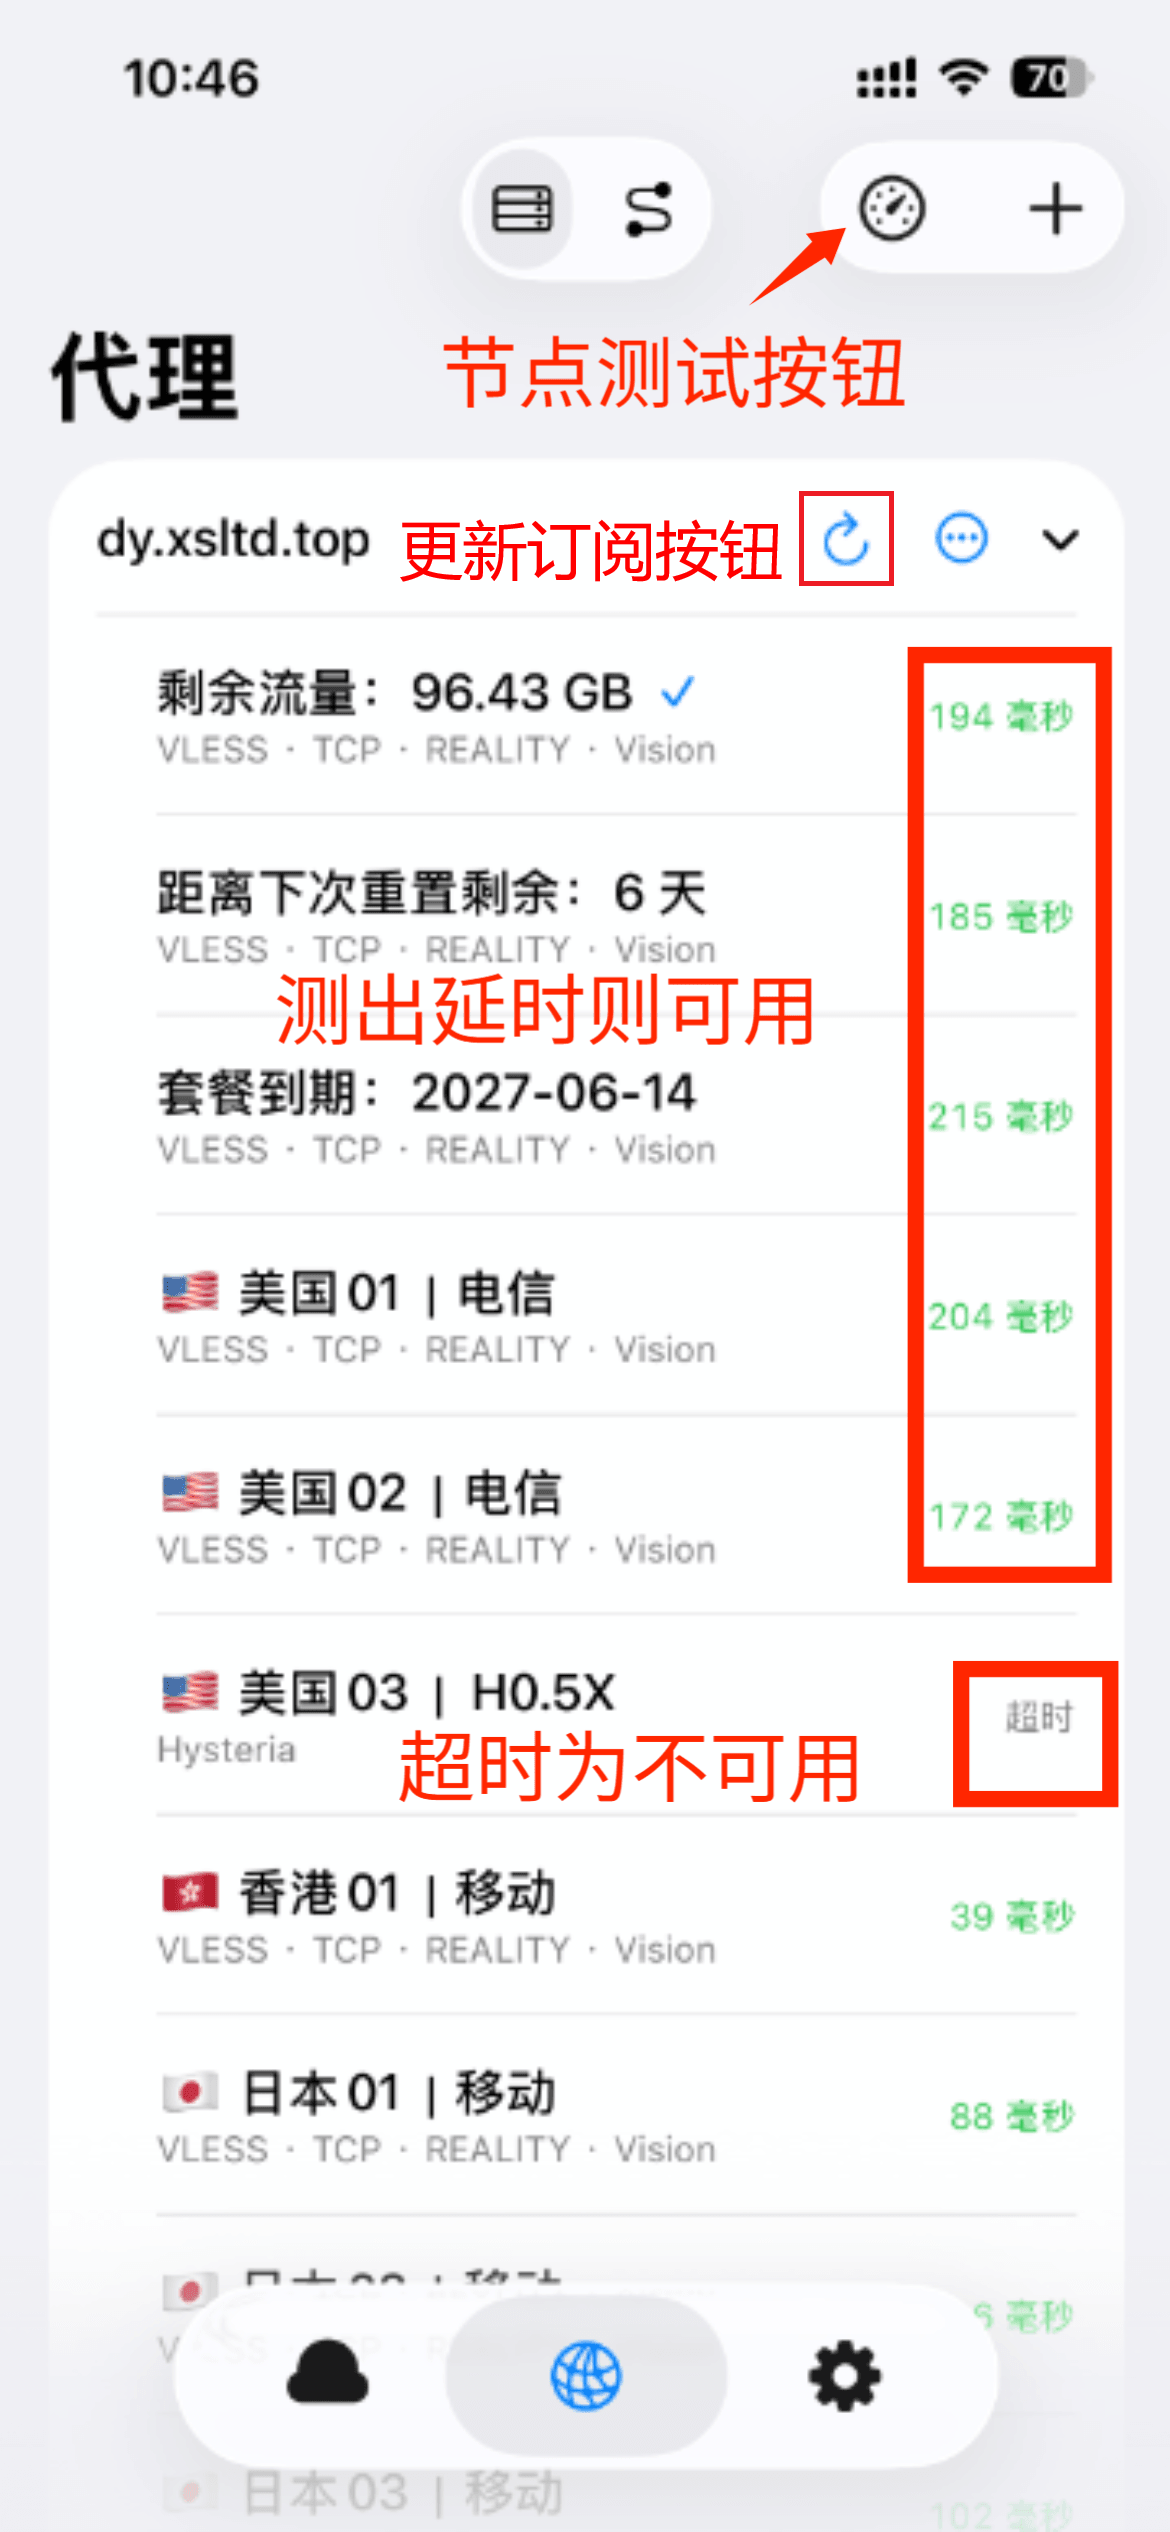
- 1. If all nodes become completely unavailable, turn off the connection switch and manually update your subscription. If it still does not work after updating, check whether your data quota has run out.
- 2. Internet speed depends entirely on your local network. If you experience a slow connection, please test your local network environment first.
- 3. Node Naming Convention: The front part indicates the node region, and the back part indicates carrier optimization (e.g., "Telecom" is best for China Telecom users; "Optimization/优化" fits all carriers but comes with a higher multiplier, such as 1.5X, meaning data consumption is calculated at 1.5 times the actual usage).
- Copy the node code and open the app.
- Default country routing is China, click Next.
- Enable or disable Ad blocking based on your needs, click Start.
- Click Add Configuration.
- Select Link. It will ask to read the clipboard. Allow it, and your copied link will auto-fill. Click Continue.
- Click the Switch to start. On the first run, it will prompt to Add VPN Configuration. Click Allow and enter your phone's passcode.
- The software is now working. You can open a browser and access Google.
Notes
- 1. This app can only import one node at a time. Copy and import the primary and backup nodes separately. Node codes begin with vless://.
- 2. Internet speed depends on your local network. If the connection is slow, please test your local network first.
- 3. Each dedicated IP is assigned two routes as a backup in case of occasional failures. Nodes with the same name use the same exit IP, so you can switch between them with confidence.
I. Download App (Requires non-Mainland ID)
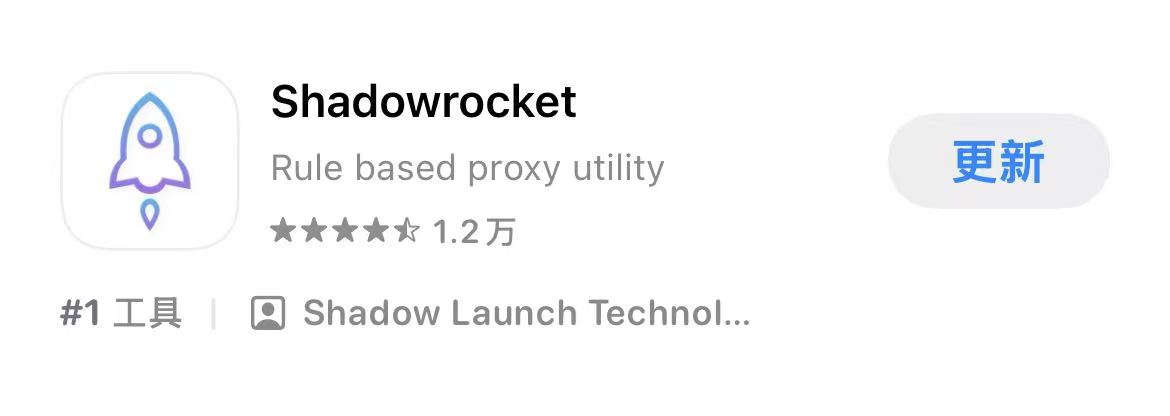
Go to Settings, change your App Store account (This app requires a US account and a $2.99 purchase. If you already purchased it, no need to change accounts. If you prefer not to use a shared account, we highly recommend using Anywhere Proxy above.)
- This ID is ONLY for downloading Shadowrocket. If you need a personal, long-term ID, you can follow our US Apple ID Guide to register for free, or use our paid registration service.
- IMPORTANT: Ensure you are already signed into your own personal ID BEFORE switching (otherwise, it may auto-sync to iCloud, creating high security risks).
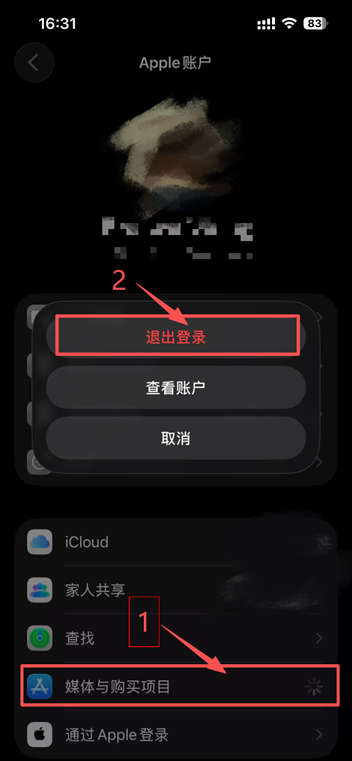
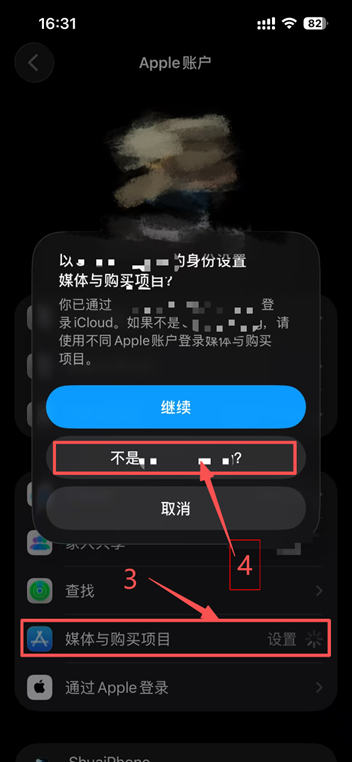
- CRITICAL: Switch accounts EXACTLY where shown in this tutorial. Signing in at the very top of Settings will log you into iCloud; we take NO responsibility if your device gets locked due to improper login.
1. Change ID
- Go to Settings – tap Media & Purchases – tap Sign Out (This action only signs out the App Store account).
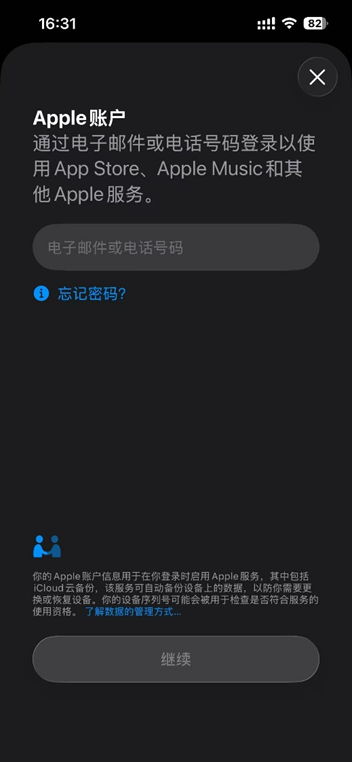
- Tap Media & Purchases again – tap "Not [Your Name]?" – enter the account and password provided above to sign in.
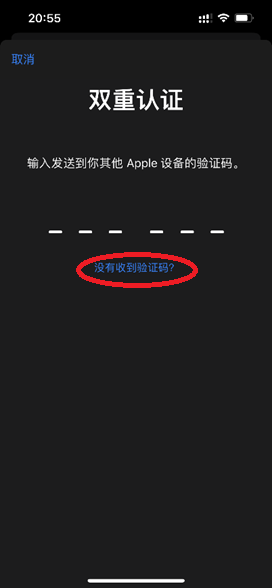
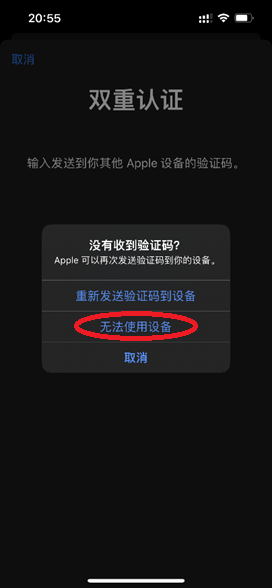
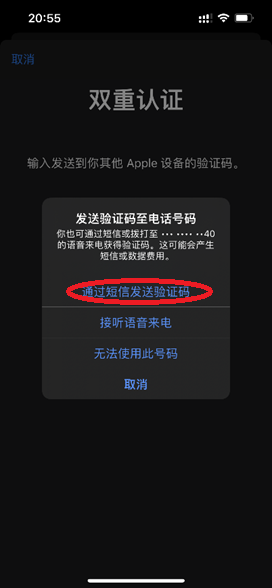
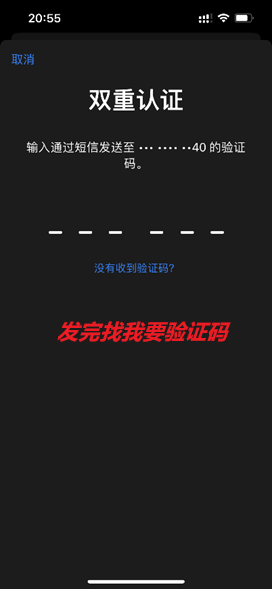
- Tap "Didn't get a verification code?", follow the subsequent steps to send it to the phone number, then contact me for the code (ideally during daytime on business days).
2. Download Shadowrocket
II. Setup the Software
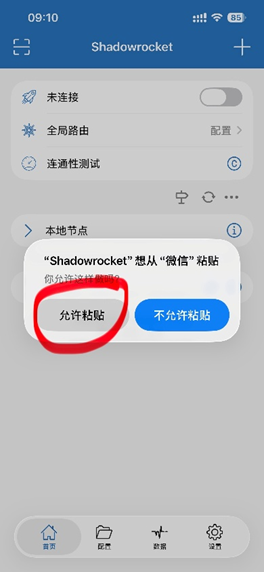
- Copy the subscription link (starts with https://), open the app and allow pasting.
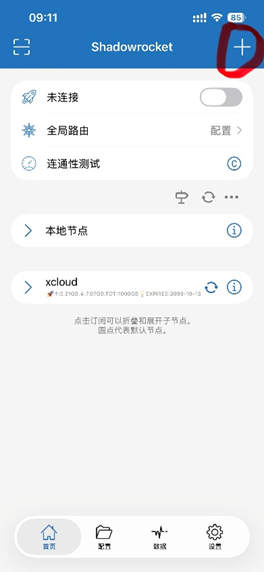
- Click the "+" at the top right.
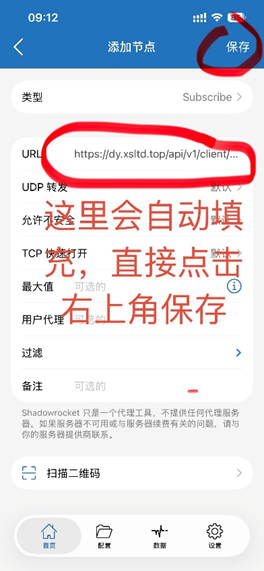
- Click Save at the top right.
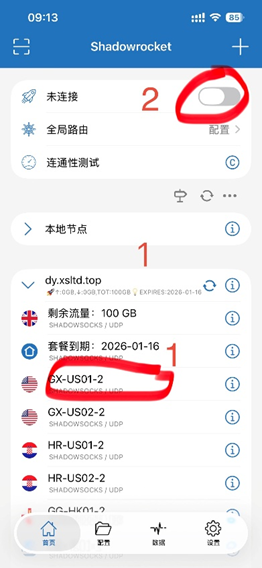
- Click the Switch to start. On the first run, it will prompt to Add VPN Configuration. Click Allow and enter your phone's passcode.
- The software is now working. You can open a browser and access Google.
Notes & Advanced Setup
- 1. Please change your Apple ID strictly following the warnings in the tutorial to avoid auto-enabling iCloud. We are absolutely NOT held liable for locked devices if you fail to follow the instructions!
- 2. Do NOT attempt to change the password of the shared account. Once downloaded, please switch back to your own Apple ID immediately.
- 3. Shadowrocket must be version 2.2.82 or later to support all nodes (you can check the version under Settings - About).
- 4. Internet speed depends entirely on your local network. If you experience a slow connection, please test your local network environment first.
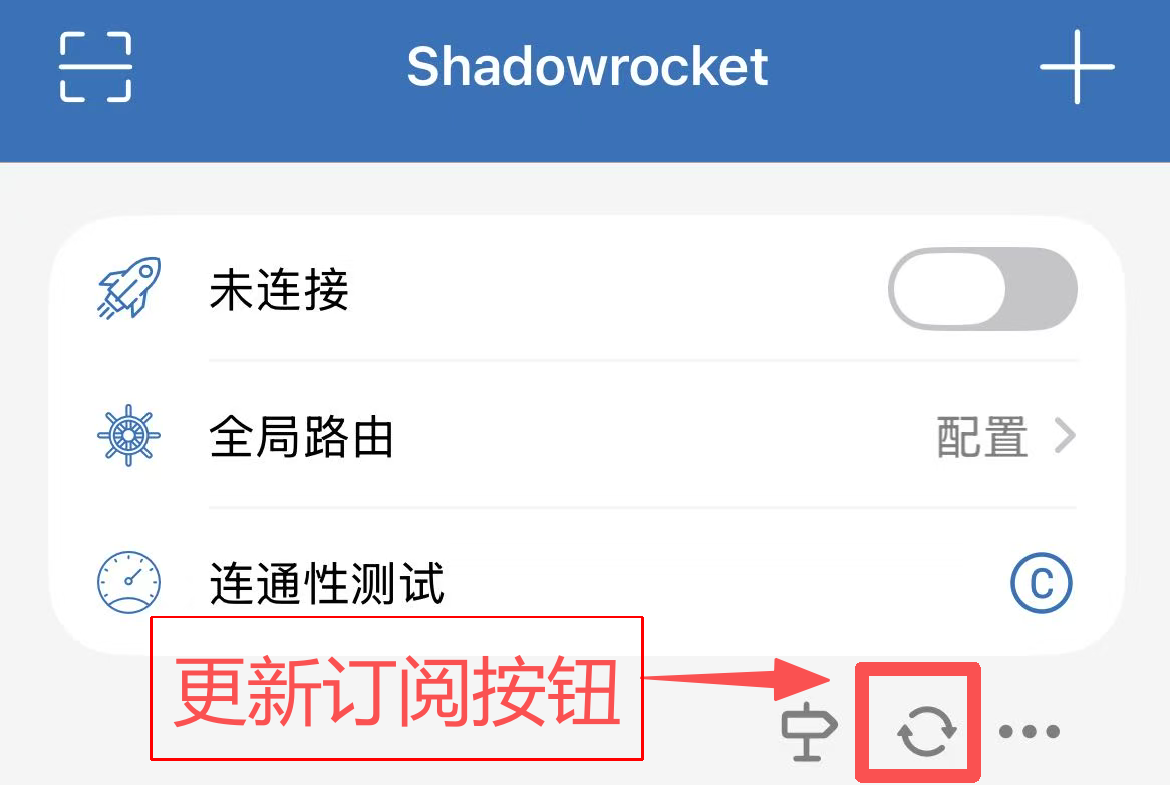
- 5. If all nodes become completely unavailable, turn off the connection switch and manually update your subscription. If it still does not work after updating, check whether your data quota has run out:
- 6. Node Naming Convention: The front part indicates the node region, and the back part indicates carrier optimization (e.g., "Telecom" is best for China Telecom users; "Optimization/优化" fits all carriers but comes with a higher multiplier, such as 1.5X, meaning data consumption is calculated at 1.5 times the actual usage).
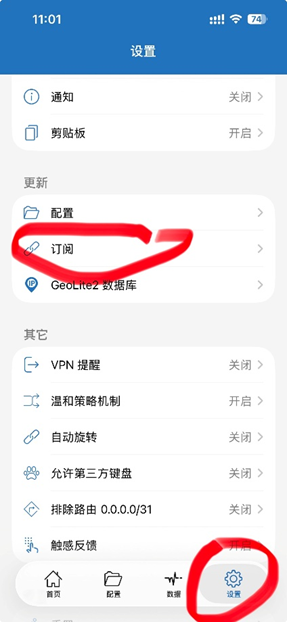
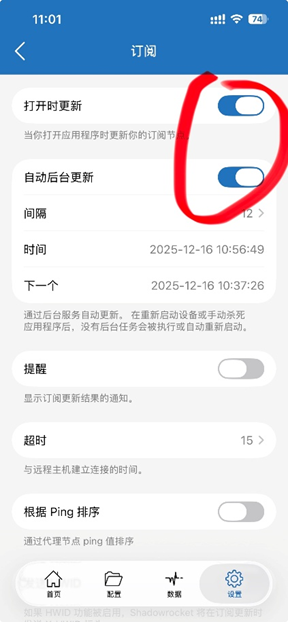
Setup Auto-update to keep nodes fresh
Troubleshooting: Test if nodes are working
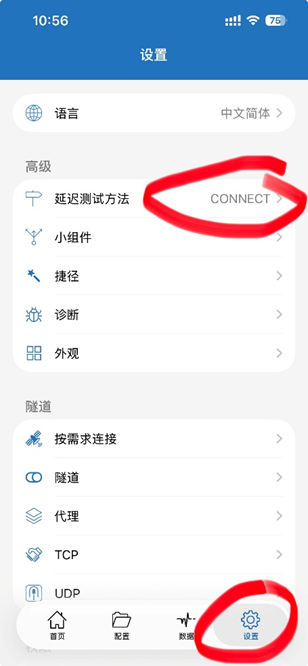
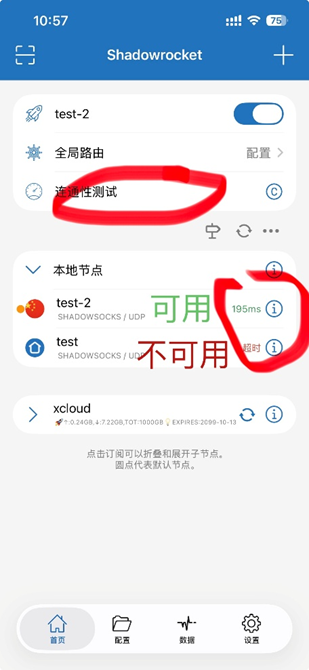
In Settings, change the Delay Test Method to CONNECT (otherwise results are inaccurate). Then click Connectivity Test on the home page. A number appearing next to a node means it's available.
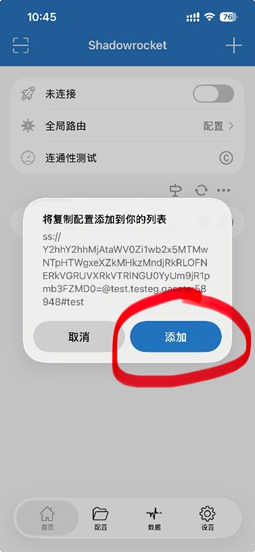
- Copy the node code, open the app and allow pasting.
- A confirmation prompt asking whether to add the node will appear. Tap Add.
- Click the Switch to start. On the first run, it will prompt to Add VPN Configuration. Click Allow and enter your phone's passcode.
- The software is now working. You can open a browser and access https://google.com.
Notes
- 1. Follow the instructions for your iOS version when changing the Apple ID to avoid automatically enabling iCloud. We are absolutely NOT held liable for locked devices if you fail to follow the instructions!
- 2. Do NOT attempt to change the password of the shared account. Once downloaded, please switch back to your own Apple ID.
- 3. Shadowrocket must be version 2.2.82 or later to support all nodes (you can check the version under Settings - About).
- 4. Internet speed depends on your local network. If the connection is slow, please test your local network first.
- 5. Each dedicated IP is assigned two routes as a backup in case of occasional failures. Nodes with the same name use the same exit IP, so you can switch between them with confidence.
Troubleshooting: Test if nodes are working
In Settings, change the Delay Test Method to CONNECT (otherwise results are inaccurate). Then click Connectivity Test on the home page. A number appearing next to a node means it's available.